Anybody using Jekyll to generate a website or blog will undoubtedly come across Jekyll collections at some point. They are an invaluable tool for grouping similar content, and understanding how collections work is a necessity for using Jekyll effectively.
The official Jekyll documentation describes collections as “a great way to group related content like members of a team or talks at a conference.” Let’s break this definition down so we understand exactly what collections are useful for.
The first important piece of this definition is that Jekyll collections group related content. In this case, content is referring to anything that will be rendered to HTML when the website is generated. This is in contrast to grouping other kinds of information, such as similar data (which belongs in a Data File).
The second important piece of this definition is that Jekyll collections group related content. The key here is that the collection shares a single content structure. If the different elements of the collection have different structures to the data, they probably belong in regular pages instead of in a collection.
This means that Jekyll collections are most useful when you’re working with rendered content that shares a common structure. Authors, team members, projects, or store locations are all great examples of use cases in which collections would be effective.
Example
Enough with the definitions. Let’s get into an example! Since using a collection for authors seems to be the most common example, we’re going to work through an example for store locations instead. Viva la brick and mortar!
Step 1: Define the collection in the _config.yml
Before we can use a collection, we need to define it so that Jekyll knows to look for our collection. Add the following collection definition to the _config.yml file.
collections:
    store_locations:
        output: true
Step 2: Create a folder for the collection content
In the root directory of you Jekyll project, add a new folder called _store_locations. Inside, we will create three distinct store locations that will share the same content structure. Each store location will contain a name, address, and brief description.
~/_store_locations/delicious_donuts.md
---
name: Delicious Donuts
address: 123 Donut Drive
---

We make the best donuts! Come try one for yourself!
~/_store_locations/perfect_pancakes.md
---
name: Perfect Pancakes
address: 456 Pancake Plaza
---

Pancakes and more! Better than your grandma's breakfast!
~/_store_locations/candy_cravings.md
---
name: Candy Cravings
address: 789 Candy Circle
---

Satisfy all your sugary cravings at Candy Cravings!
Step 3: Use the collection content as desired
Now that we have declared our Jekyll collection and defined some content, all that’s left to do is use it! Creating a listing of all store locations is a simple use case that is used quite commonly for any business with multiple store locations.
Create a stores.html document in the root folder of your project and put the following content inside:
---
title: Store Locations
---

<h1>Store Locations</h1>

<ul>
    {% for store in site.store_locations %}
    <li>
        <h2><a href="{{store.url}}">{{store.name}}</a></h2>
        <h3>{{store.address}}</h3>
        <p>{{store.content | markdownify}}</p>
    </li>
    {% endfor %}
</ul>
When you read through the HTML, you’ll notice several instances {% ... %} and {{ ... }} . Jekyll uses Liquid to create templates for pages. Using Liquid, Jekyll is able to provide much more advanced functionality with little additional effort. All that’s really important in this example is to understand that we are rendering a list of all the store locations. If you want a better understanding of Liquid’s functionality, check out the official Liquid documentation.
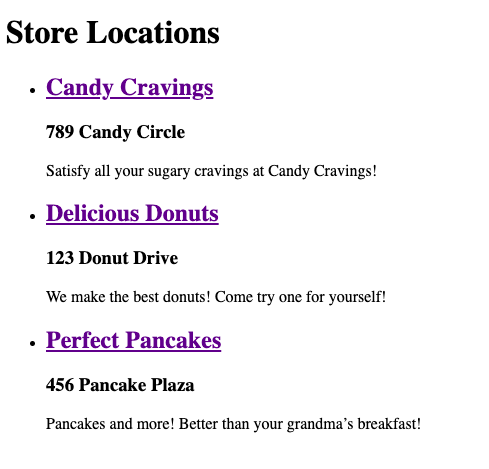
The resulting page should look something like the following:

You can also click into the pages for each store location to see the content associated with that location. You can create a custom template for the objects in that collection if you want to make it look nice or display some additional information, but we are going to leave it for now. We should just see the content we added to the file, which should look something like this:

Summary
That’s pretty much all there is for understanding the basics of Jekyll collections. Once you understand the basics, there are lots of ways to extend and customize the behavior to suit specific needs. I may make some future blog posts to discover some of these customizable features.
Comments