If you’re like me, you want your GitHub Pages website to show up on a domain that is not .github.io. Learn how to do exactly that in this blog post.
Adding a Custom Domain to GitHub Pages
When it comes to blog-friendly static site generators, Jekyll is definitely near the top of the list. One of the reasons Jekyll is so popular is because of the “magic” integration with GitHub Pages.
GitHub Pages allows somebody to push static site content to a GitHub repository and GitHub will render that content as a live website. It’s super handy, and best of all, it’s entirely free to use.
GitHub hosts these websites at a user’s subdomain of {GitHubUsername}.github.io, and this is entirely sufficient for many projects. However, it’s a common use case that users want to use a custom domain for these sites. Fortunately, GitHub allows us to do exactly that.
Step 1 - Purchase a Custom Domain
Before you can use a custom domain with your GitHub Pages site, you will need to purchase it first. Domains are purchased annually through a Domain Name System (DNS) Registrar such as GoDaddy or NameCheap. It’s rather straightforward so we won’t go into detail in this post.
Step 2 - Add Your Domain to the GitHub Pages Repository
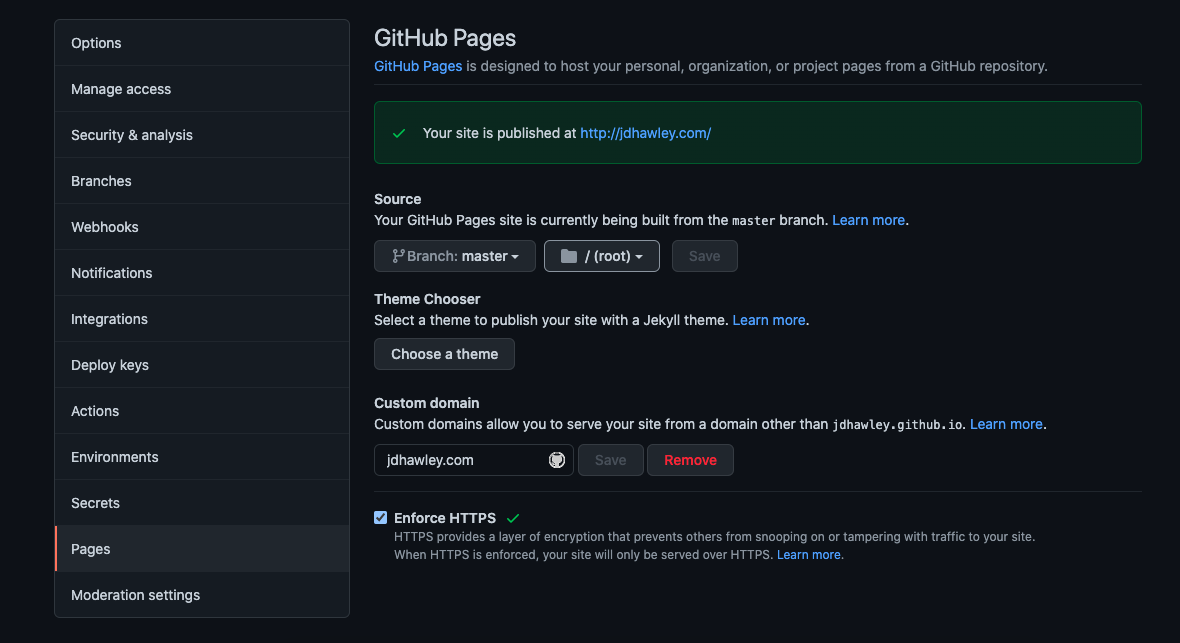
Navigate to the settings for the GitHub Pages repository. Under the “Pages” submenu, enter in your custom domain.

This will create a commit in your repository that adds a CNAME file to the repository. Do not delete this file as it’s GitHub’s way of knowing that the repository will be linked to a custom domain.

Step 2a (Optional, but Recommended) - Verify Your Custom Domain at the User Level
GitHub enforces unique domains in CNAME files across all GitHub Pages repositories to ensure that incoming traffic can be routed to the right website. Once a domain has been added to the CNAME file in a repository, it cannot be used in another repository. In other words, the repository with a CNAME for a specific domain is considered the “owner” of the domain by GitHub.
As long as the GitHub Pages repository stays on GitHub with the domain in the CNAME file, the domain will be safe. However, if the CNAME file is removed from the repository or the repository is taken down, the domain could be hijacked by another GitHub Pages site.
The best way to prevent this from happening is to verify a custom domain at the user level. Navigate to the user settings for the GitHub account that owns the repository. In the Pages submenu, find the settings to verify a domain. You’ll have to add a TXT record in the DNS settings with your registrar, but this prevents the possibility of somebody else hijacking the domain if something happens to the CNAME record in your repository.

Step 3 - Add DNS Records
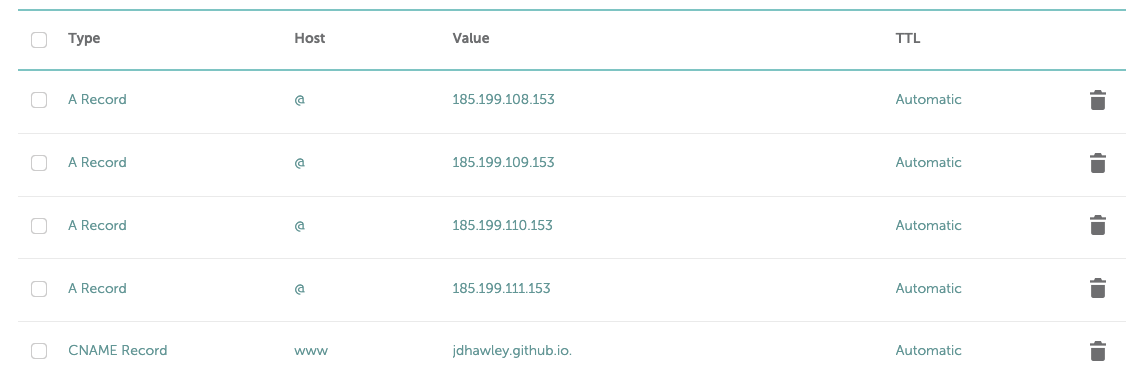
There are a total of five records that needed to be added to the DNS registrar settings for the domain. In this specific case, we are going to use four A records and a CNAME record. The screenshot below shows what the final result looks like for this website using NameCheap as the registrar. After the screenshot are brief descriptions of what each type of record does.

A records
A records are the most fundamental records in the DNS world. “A” stands for “address”, and A records point a domain name to the IP address of the destination. You can think of A records like a phone book, where somebody looks up a name and gets a phone number. A records function similarly by using a domain name and getting an IP address back out. In this case, the jdhawley.com domain will have four separate A records pointing to the four GitHub Pages servers.
As of the time of writing, the GitHub Pages server IP addresses are as follows:
185.199.108.153
185.199.109.153
185.199.110.153
185.199.111.153
CNAME records
Whereas A records use a domain name to look up an IP address, CNAME records are used more like a forwarding address. CNAME records will forward one domain to another domain. We are going to use a CNAME record to “forward” the www subdomain to GitHub Pages. This means www.jdhawley.com will work just as well as jdhawley.com.
NOTE: the CNAME record is only required if you want the www subdomain to work.
Step 4 - Wait
Ah yes, the step none of us want to see. Unfortunately, DNS settings do not propagate immediately. Changes take up to 24 hours to propagate fully and there is no way to speed up the process. I was impatient and started troubleshooting before 24 hours. I do not recommend it.
If you’re feeling particularly antsy to see your GitHub Pages site in action, you can check back every couple hours or so. It usually doesn’t take the full 24 hours to propagate, but don’t start troubleshooting until that point.
Additional Resources
[Using custom domain for GitHub pages Hossain Khan](https://hossainkhan.medium.com/using-custom-domain-for-github-pages-86b303d3918a) [Linking a Custom Domain to GitHub Pages Rich Pauloo](https://richpauloo.github.io/2019-11-17-Linking-a-Custom-Domain-to-Github-Pages/) [About Custom Domains and GitHub Pages GitHub Docs](https://docs.github.com/en/pages/configuring-a-custom-domain-for-your-github-pages-site/about-custom-domains-and-github-pages)
Comments